Army Trunk Turned Gaming Storage/Coffee Table
Let me tell you why you need an old Army Trunk Turned Gaming Storage/Coffee Table. No matter if you are thinking about your kitchen, bedroom, or outdoor areas, storage always is part of the planning. I guess now is a time to reveal a bad habit – I kick my shoes off and they usually stay in that spot for a while. Surely I’m not the only one doing that. Am I? And that even happens on the front porch.
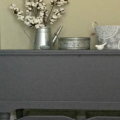
As we were getting our porch done and it looked “pretty” I didn’t want our shoes left to show. We use our front door a lot. I tried placing a bucket just inside the door for this, but it seemed if the shoes were wet, they didn’t make it in. Ok – what to do?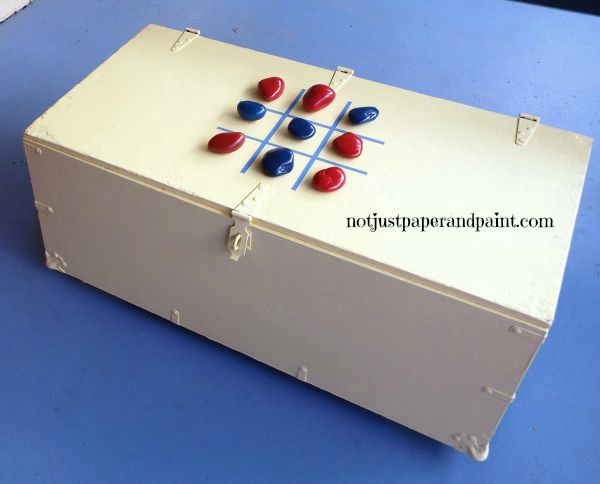 I had a couple old Army trunks in the garage which I had picked up at a yard sale for $5 each. One original thought was to make a coffee table but it didn’t work in the space. Let’s do a coffee table for the front porch. Not only would it give me storage, but a place to set drinks and put my feet up while sitting on the front porch swing.
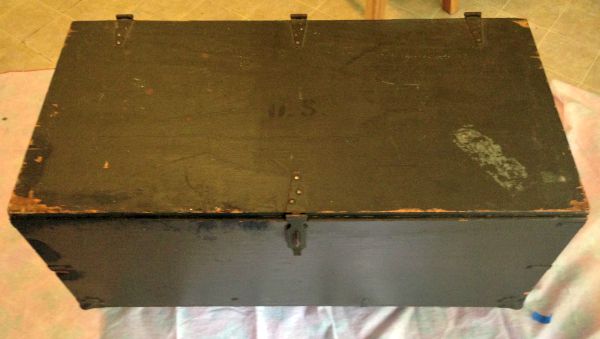 This was probably one of these easiest and cheapest projects I have ever done. But you will see more ideas were added along the way.
First was deciding on color. It would be yellow and I knew there was still paint left over from the porch painting. Good – starting off with no additional costs.
After a good cleaning with wood cleaner, painting was all it needed.
I did give it one coat of white paint with primer since there was some unfinished wood exposed. There were several uneven areas of the trunk, but for this project it was ok to leave. Sorry, no boring picture of white primer, but you get the picture.
The hinges were riveted on and since the wood was dried out, I was afraid if I tried to remove them, the wood wouldn’t hold up, so I just left them on and painted over. I used paint left over from painting the porch floor (see all of this in upcoming post).
After 2 coats of Royal Porch & Floor Paint in Butter Churn from Elders Ace Hardware, it was done. Or so I thought. It was just too plain looking.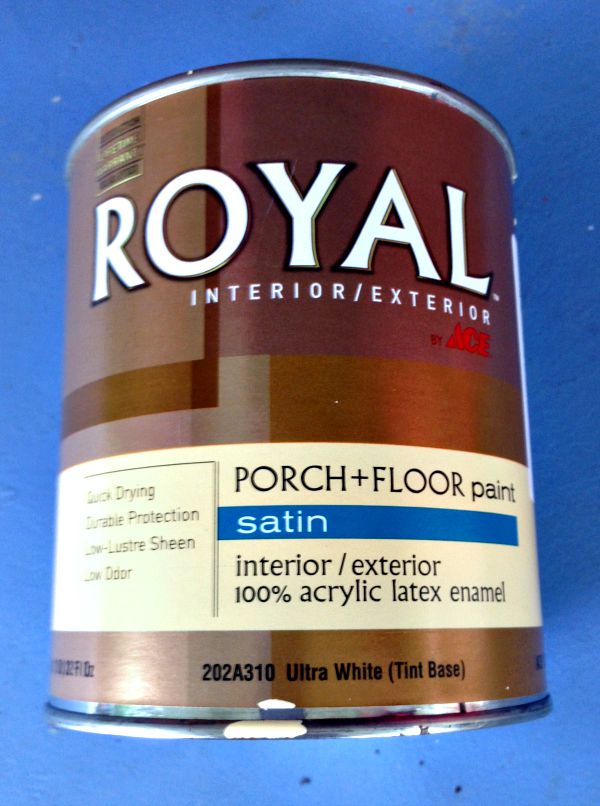 My first thought was to stencil the top to match the rest of the porch but wasn’t thrilled with that idea. A checkerboard would be cute, but with size limits between the hinges, it wouldn’t work. Tic-tac-toe was the answer. And would be easy to do.
Now to find the playing pieces. Again, this was supposed to be a use what I had and cheap project. After looking around in my stash of stuff, rocks would do the trick. These rocks were from the craft store but you could look around the yard and maybe find some too.
I keep some of these rocks inside a watering can on my porch just to weigh it down.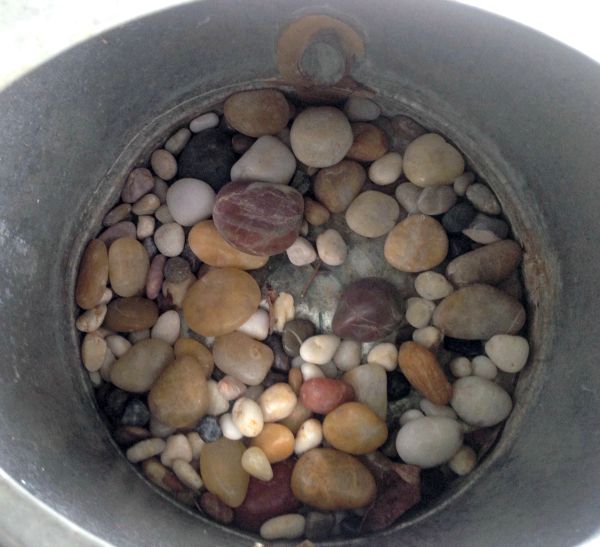 They were washed and allowed to dry then a couple of coats of red and blue paint had them done. Gotta love Rust-Oleum 2X paint and the comfort grip.
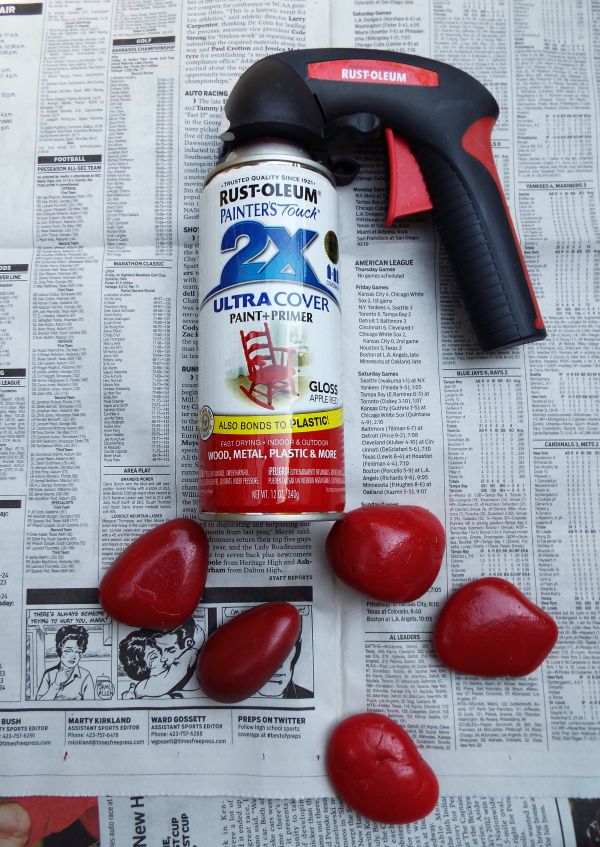 The lines for the top would be painted in the Monday Blue, also Royal Porch & Floor paint from Elders Ace Hardware.
I made a pattern using some scrapbook paper so I would know how to space my lines.
Each line would be 1/4″ wide. So I divided my paper into thirds, then also into half so it could be centered between the middle hinges.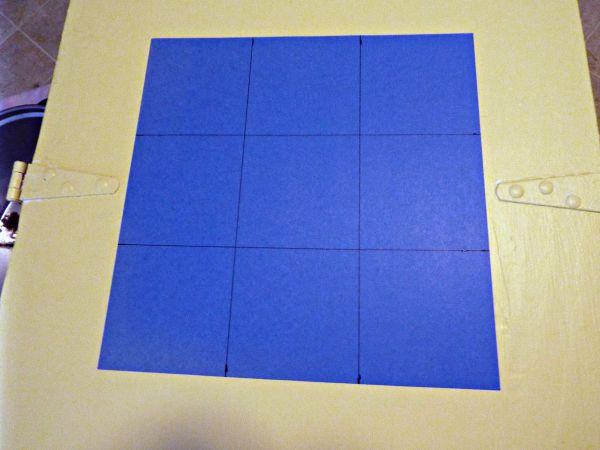 Using 3M painters tape, a square was taped off because this would the edge of each line. Two lines were taped off to create the vertical lines. Remember the burnish the edges of tape well with an old credit card to prevent bleeding.
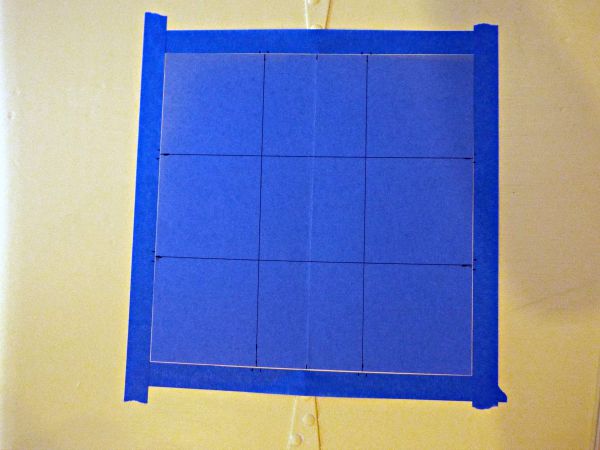 Three light coats were painted, letting dry about 45 minutes between each.
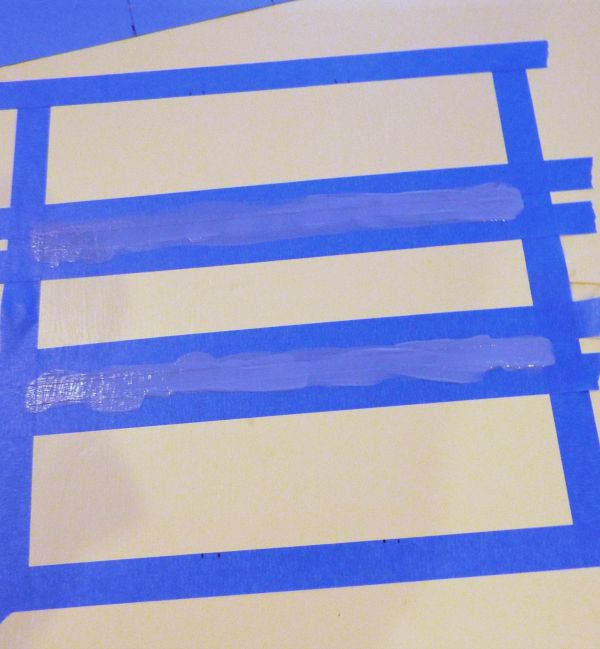 After the final coat, the tape for these lines was removed and left to dry overnight.
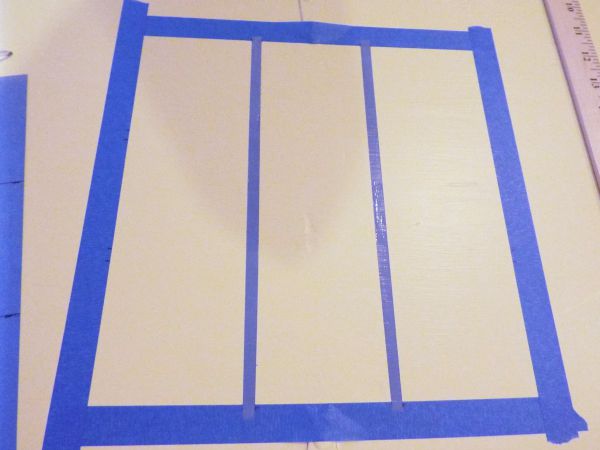 The next day, the same process was used for the horizontal lines.
  Now it was done.
 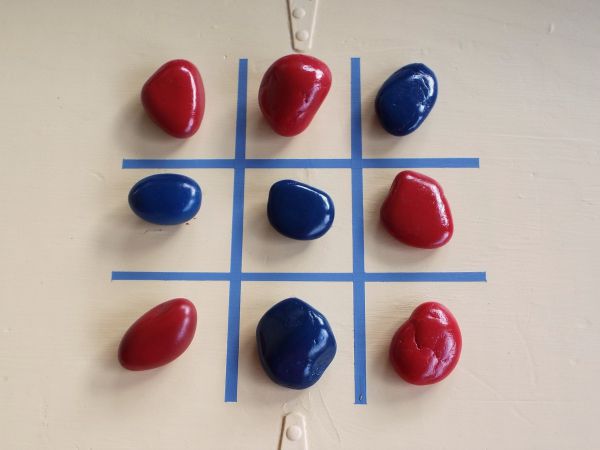 Wait – no it’s not.
This trunk was going to be used on a covered porch but rain can blow in sometimes so I decided maybe legs should be added so moisture wouldn’t accumulate under it. Remember this is a cheap project. I found a couple pieces of 2 x 4 which would do the trick. One piece was about 3/4″ shorter, but that didn’t bother me since it would still work.
I painted these 2 pieces with the same yellow paint. After the 2nd coat they dried overnight.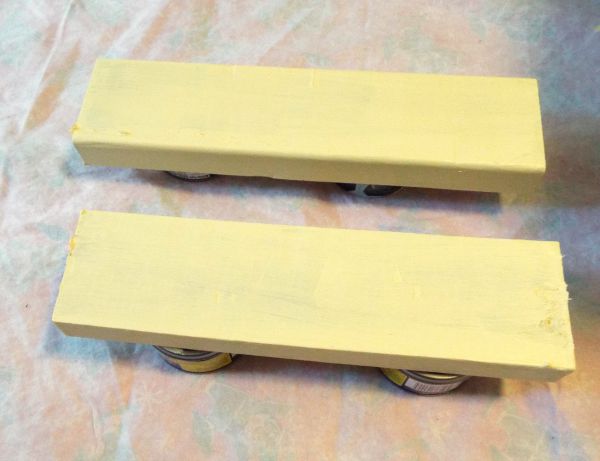 These were attached by using wood screws and screwing in from the inside of the trunk. The legs were placed underneath, just really eyeballing the placement. I measured in to see it was about 2″ and then drilled 3 pilot holes about 2 3/4″ in 3 places. Using a drill like this Ryobi, makes getting into corners so much easier.
 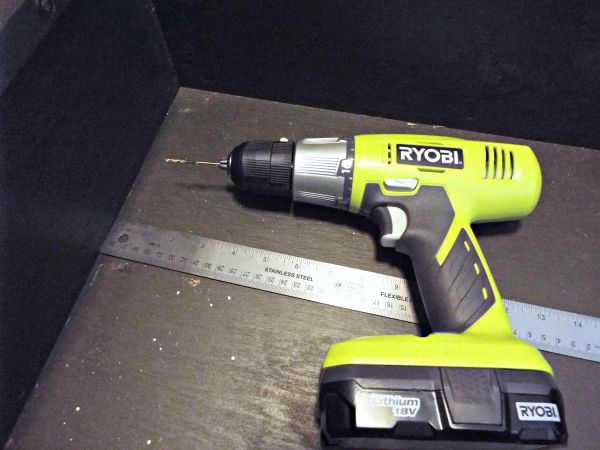 These weren’t measured exact. I went to my jar of old screws and found enough to use for the project.
 Legs were attached on both ends and now – IT’S FINISHED.
Now to keep the stuff hidden on the porch.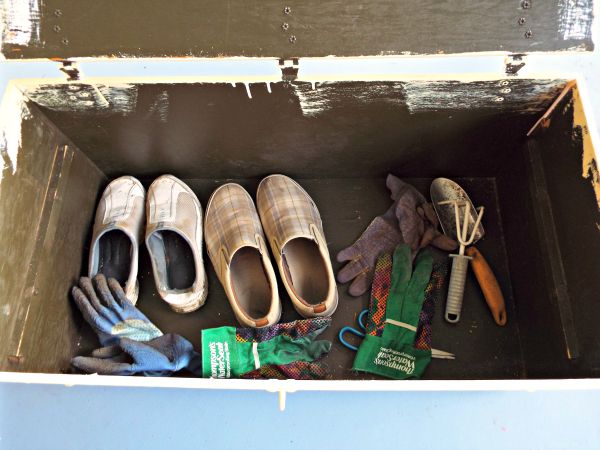 This will not only be used for shoes, but also some of my small gardening tools and gloves that I use in my front porch area. I figured it up, and using what I had on hand my total cost for this project $0. Best kind of project to do. I’ve had the trunk for about a year, so I don’t really consider that any cost. It freed up space in my garage. Worth a lot more than the original $5 I spent.
Who’s up for a game of tic-tac-toe with a glass of wine or sweet tea? 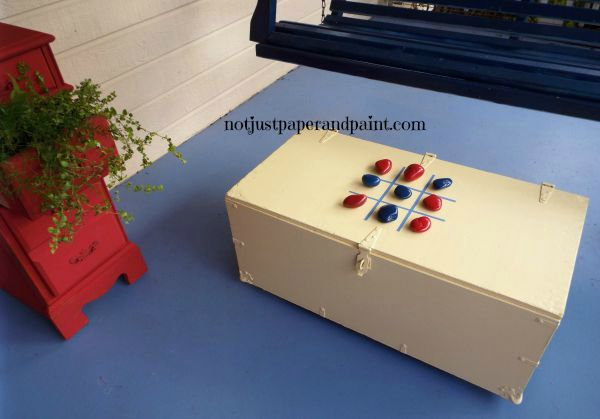 Make sure you come back over the next few days for my complete porch makeover.
This could also make a great storage trunk in a kids room, but you would need to replace the hinges with other types made for toy boxes for safety reasons.
I have two more of these trunks – remember they were only $5 each and since there were three, why not buy them all.
Not what shall I do with the other two? Ideas?


I’ve included affiliate links to Amazon for you to find some products easier. I may receive a small commission, but the price is the same for you. It just helps my blog out.
Happy Travels,
Rosemary

I loved how the trunk turned out! Storage is definitely always a huge issue so it’s great that you were able to take something old and put it to good use. I can’t wait to see your porch makeover <3
Thanks. My porch is kind of like this trunk. I think I’m done, and I do more.
What an interesting DIY project I really do like! I think it is unique and will be sharing the idea with a friend who was looking to do something very similar to this!
It is amazing sometimes what can be done with almost nothing. Thanks for sharing.
I love that you did the tic-tac-toe game on here… it makes it so inviting for people to hang out on the porch. You can’t beat a $5 investment like that!
Thanks = thought it turned out cute too. Enjoying it also.
No way! That came out awesome. What a fun DIY project and it totally turned out great.
Find something cheap and make a treasure. Hope you try something like this.
That’s a great idea! We have a crate with a lid on our porch for rock salt in the winter, but it’s flat on the concrete porch. I need to raise it up like you did with yours!
My porch doesn’t get that wet, but was afraid it might collect moisture and either rot my trunk or get moldy.
That turned out great. It looks like a piece that you and your family will get great use out of for a long time to come.
I enjoyed it this morning, having a great place to set my coffee.
You are so creative. I love how nice this army trunk turned out. My MIL has a similar trunk and she wants to throw it away. I will show this to her.
If she won’t transform it, maybe she will let you have it. Or you could transform it for her.
Clever idea! There are so many things in our storage that can be recycled like the once you did with the army trunk. DIY thing is really fun. Saves space, money, and time!
I think it is fun to use what you have and see what it turns into.
This is really creative and useful. You get a nice game table and also have a storage inside it.
Storage was my main goal, it just turned out cuter than expected.
Shoe storage always seems to be an issue, but this trunk is a great solution. We like to keep our shoes by the door, at least until they dry if it was raining or something.
I’m hoping this will help with my bad habit of just tossing off my shoes.
I love this trunk! I’m definitely looking for some new storage ideas as our garage definitely needs a makeover!
I still have 2 more, so thinking how I could use them.
In the past, I have thought of buying an antique trunk to repurpose it buying turning it into a coffee table. Therefore, I love how your repurposed yours! 🙂
I love how it turned out, hoping to do something with my other 2.
I like how this turned out! My sister used a trunk from her childhood as a coffee table for a while.
I still have 2 more in my garage, now what to do with them.
what a smart/fun/practical way to amp up the visuals on the coffee table. I really like it!
Thanks – I knew it had to have something on top. Thought about a tray, but knew it would just get too dirty, too quickly outside.
What a great idea! I absolutely love the tick tack toe game on the top. What a fun trunk to have around.
Thanks – kind of different from stuff I usually do.
Great idea, and it looks great too!
Thanks = I was happy with the finished item. Looks even if I say so myself on my porch.
Omg this came out so cute!!! It would be perfect for the room in my basement since we are going with a game theme!
it’s worth so much more thsn your $5 investment. You know I’ll always cheer any additional storage!
To me though too if you pull something out of garage that’s over a year ago, it’s a freebie. Lots of places I need more storage and organizing. Pantry, dish closet (which was hall linen) and my studio/office.