Holiday Hostess Gift
Do you struggle when you need to take a hostess gift to an event, or even just a home-made gift for someone special? Consider these Strawberry Snowmen on a Peppermint Plate.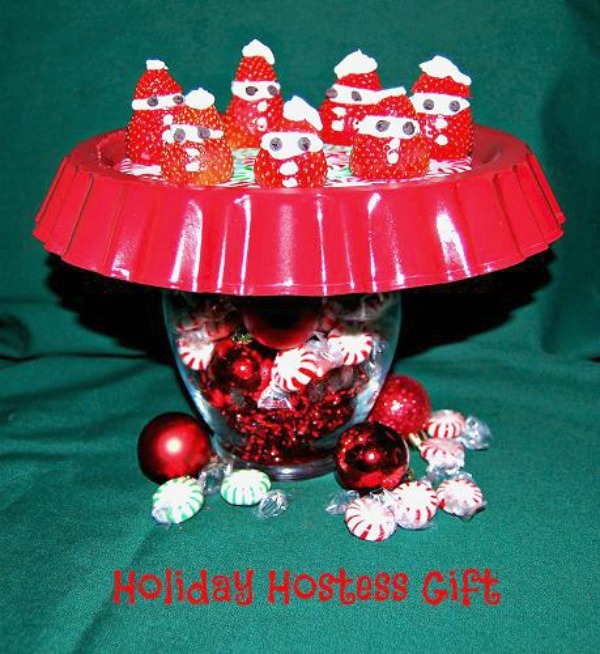
Most of the items you will need are easily available, or you may even have at home.
This is divided into sections – Peppermint Plate, Vase Container and Decorative Plate, Strawberry Snowmen then assembly of final product
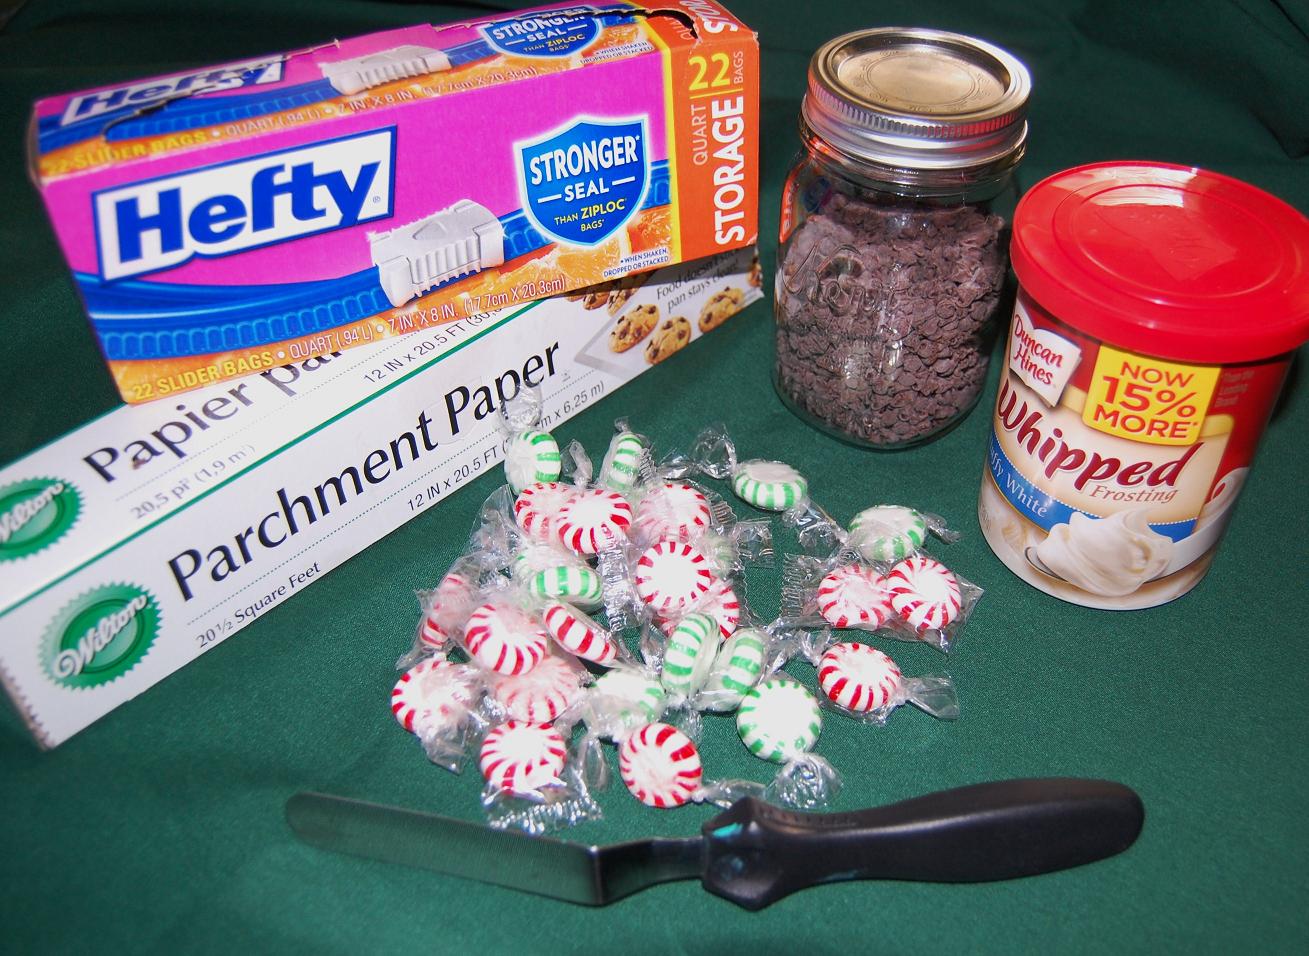
Supplies for Peppermint Plate
Parchment paper
Marker
Circle template
Peppermint candies – red and/or green (2 bags)
Cookie sheet
Determine how big the circle needs to be then trace around your template (I used a bowl) onto the parchment paper. You will turn this over so your candies won’t be in contact with your markings.
Preheat oven to 300.
Lay your parchment paper onto the cookie sheet, marked side down. Start on the inside edge of your circle and place your candies almost right to the line and leaving approximately 1/8” between the candy pieces to allow for melting. Sometimes this is a guessing game as the pieces can vary in size and thickness a bit. Do another circle of candies inside that circle, then fill in the middle. For the tart pan, it was 2 full circles, then 3 pieces in the middle but the size you make, will determine how many candies you will need.

Carefully place your completed circle into the preheated oven and set your timer for 6 minutes. After 6 minutes, check to see if they have melted together. If they still look like they are holding their shape, allow about 45 seconds then check again. Keep checking every 30 seconds until they melt. These can quickly overheat. (I know from experience). Once they have pretty well covered your circle, remove from the oven. If there are any air bubbles or holes where it hasn’t melted together, use a tooth pick to pop these bubbles or to spread your candy to fill in any spaces. REMEMBER – this is HOT candy and can burn, but it does tend to cool fairly quick, so you need to work quickly.
As I said, this can quickly over cook. If this happens, there’s really nothing to do but make another one. You might consider buying a 2nd bag of candy just for this reason. Also, the green candy I got was spearmint flavored and it tended to melt more unevenly than the red. I don’t know if it was the brand or possibly the spearmint oil was affected by the temperature more so than the red peppermint.
Remove from the cookie sheet and let cool completely while still on the parchment paper. Make sure this is on another flat surface – I used another cookie sheet. After this has completely cooled, you can store it in a zip top bag until you are ready to use. If you keep it air tight, you should even be able to do this a couple of days in advance.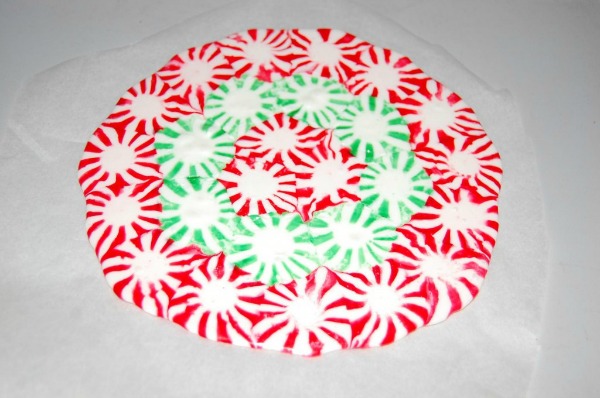
Supplies for decorative plate and vase
Clear container
Shredded filler
Small ornaments
Extra peppermint candy
Tart pan
Spray primer
Spray paint
Glue gun – optional
I used a vase that I had on hand, but you could always pick up one at a thrift store or a dollar store. A mason jar or any clear cylinder would work. In fact you could purchase everything at your local Dollar Tree, except the possibility of the tart pan and paint. But you could consider a cake pan or even a clear plate. I had another blogger friend who had used a tart pan for a different project, and thought the fluted edges were really cute so wanted to try it for this.
Make sure your tart pan is clean and grease free, run through your dishwasher if possible. I gave it a good coat of primer, then 2 – 3 coats of red paint. I don’t usually use Walmart paint but I do love the Fire Red color they have. Let dry at least 24 hours. You could do this several days in advance. Remember, no food for consumption should come in direct contact with the painted surface.
Fill the bottom of your vase first with filler, then continue to add the ornaments and candy until full. 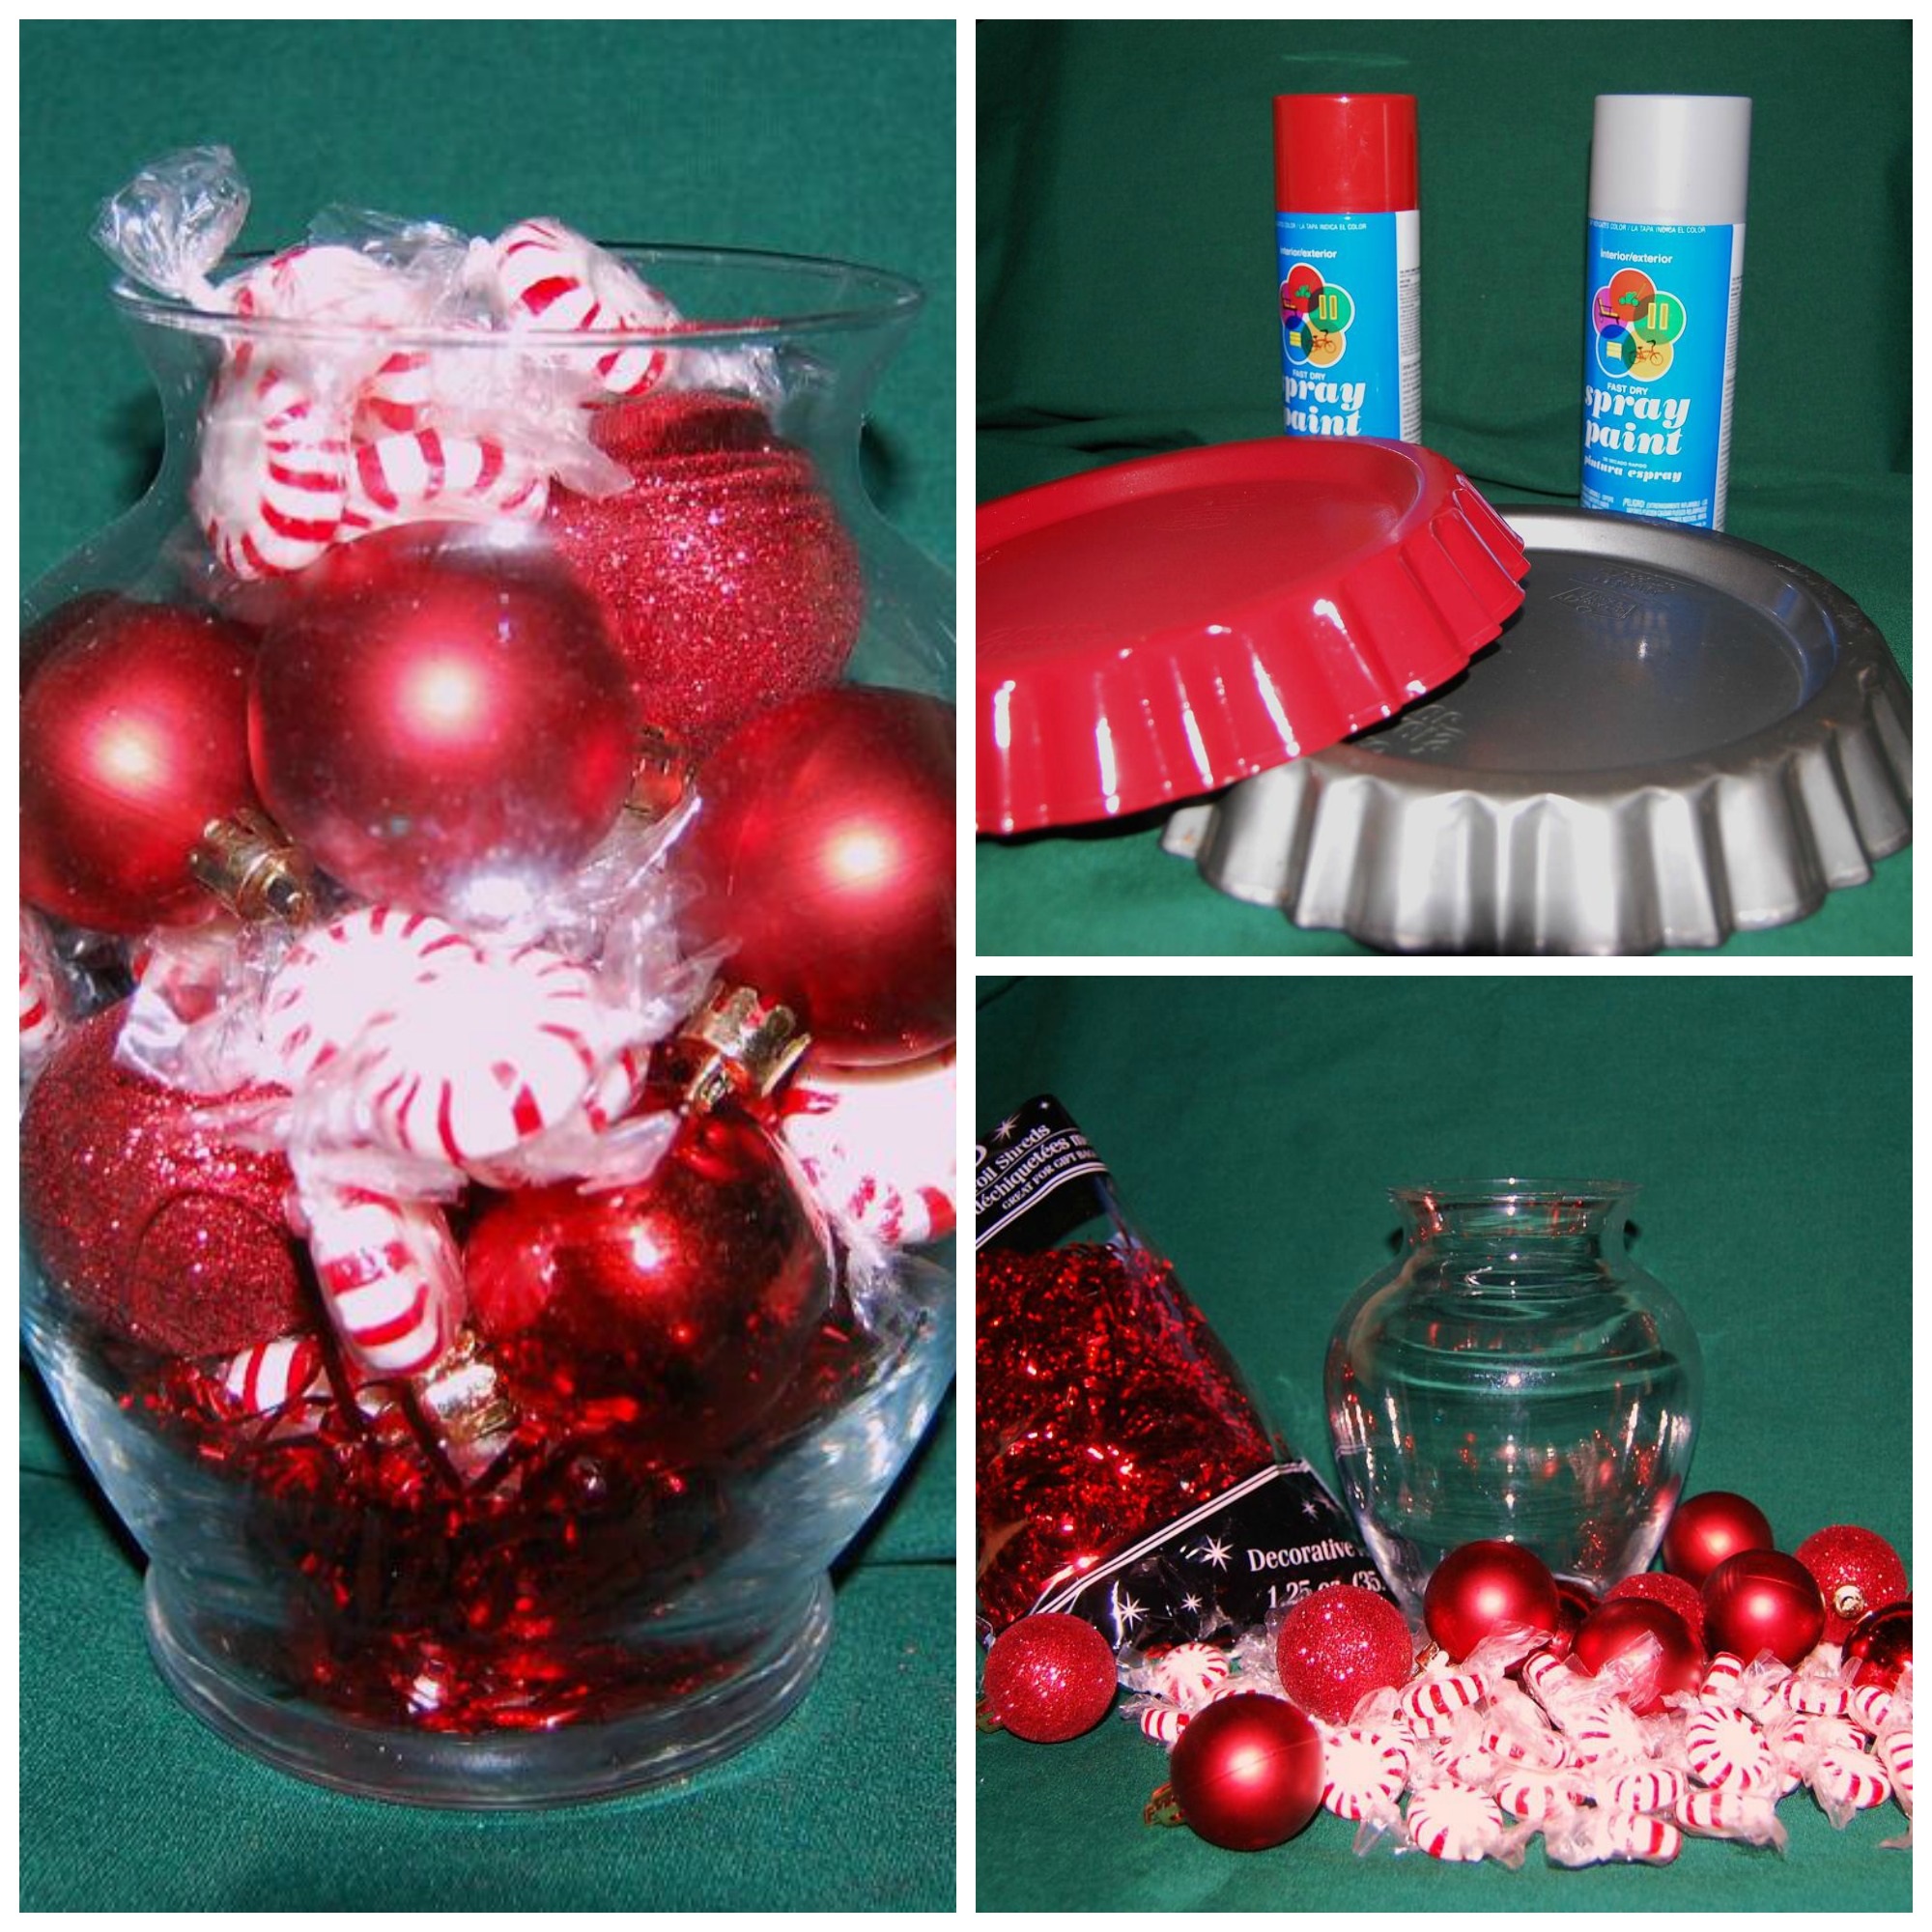
Strawberry Snowmen
Strawberries – look for brighter red, but not overripe – the larger the better
Frosting – Betty Crocker Whipped Vanilla is pretty good, although you may choose to make your own buttercream, or even a cream cheese frosting.
Mini chocolate chips
Freezer bag or Pastry bag and small tip
Wash and dry your strawberries. I even let them set on a rack to dry better. Any moisture from the strawberries can cause your frosting to slide. Even after I slice them, I have put them on a paper towel to draw out even more of the juice.
Cut off the stem end to form your bottom then cut off about 1/4” for the “hat”. This can depend on the size of your strawberry. Place on paper towel, cut sides down. Make sure you keep these two parts together so when you go to build your snowman. Scoop out some of the inside of the larger piece but don’t go all the way through the bottom or sides. If they appear to be really juicy, I would turn them over on the paper towel for 5 – 10 minutes more. Since they are being filled with frosting, you don’t have to worry about them being juicy to eat.
Pastry bag – Insert a small round tip then fill halfway with frosting.
Freezer bag – Don’t use a sandwich bag as these are thinner and could burst from the pressure of piping. Fill halfway with frosting. Make a VERY small clip on one corner. You can always clip a bit more, but if you cut it too big, you don’t have as much control with your piping.
Fill the strawberries with frosting and continue piping to make a mound on top – this is the face. Place the other piece on top for the cap. Pipe a small amount on top for the fur. You can bring a slight amount down the side if you desire.
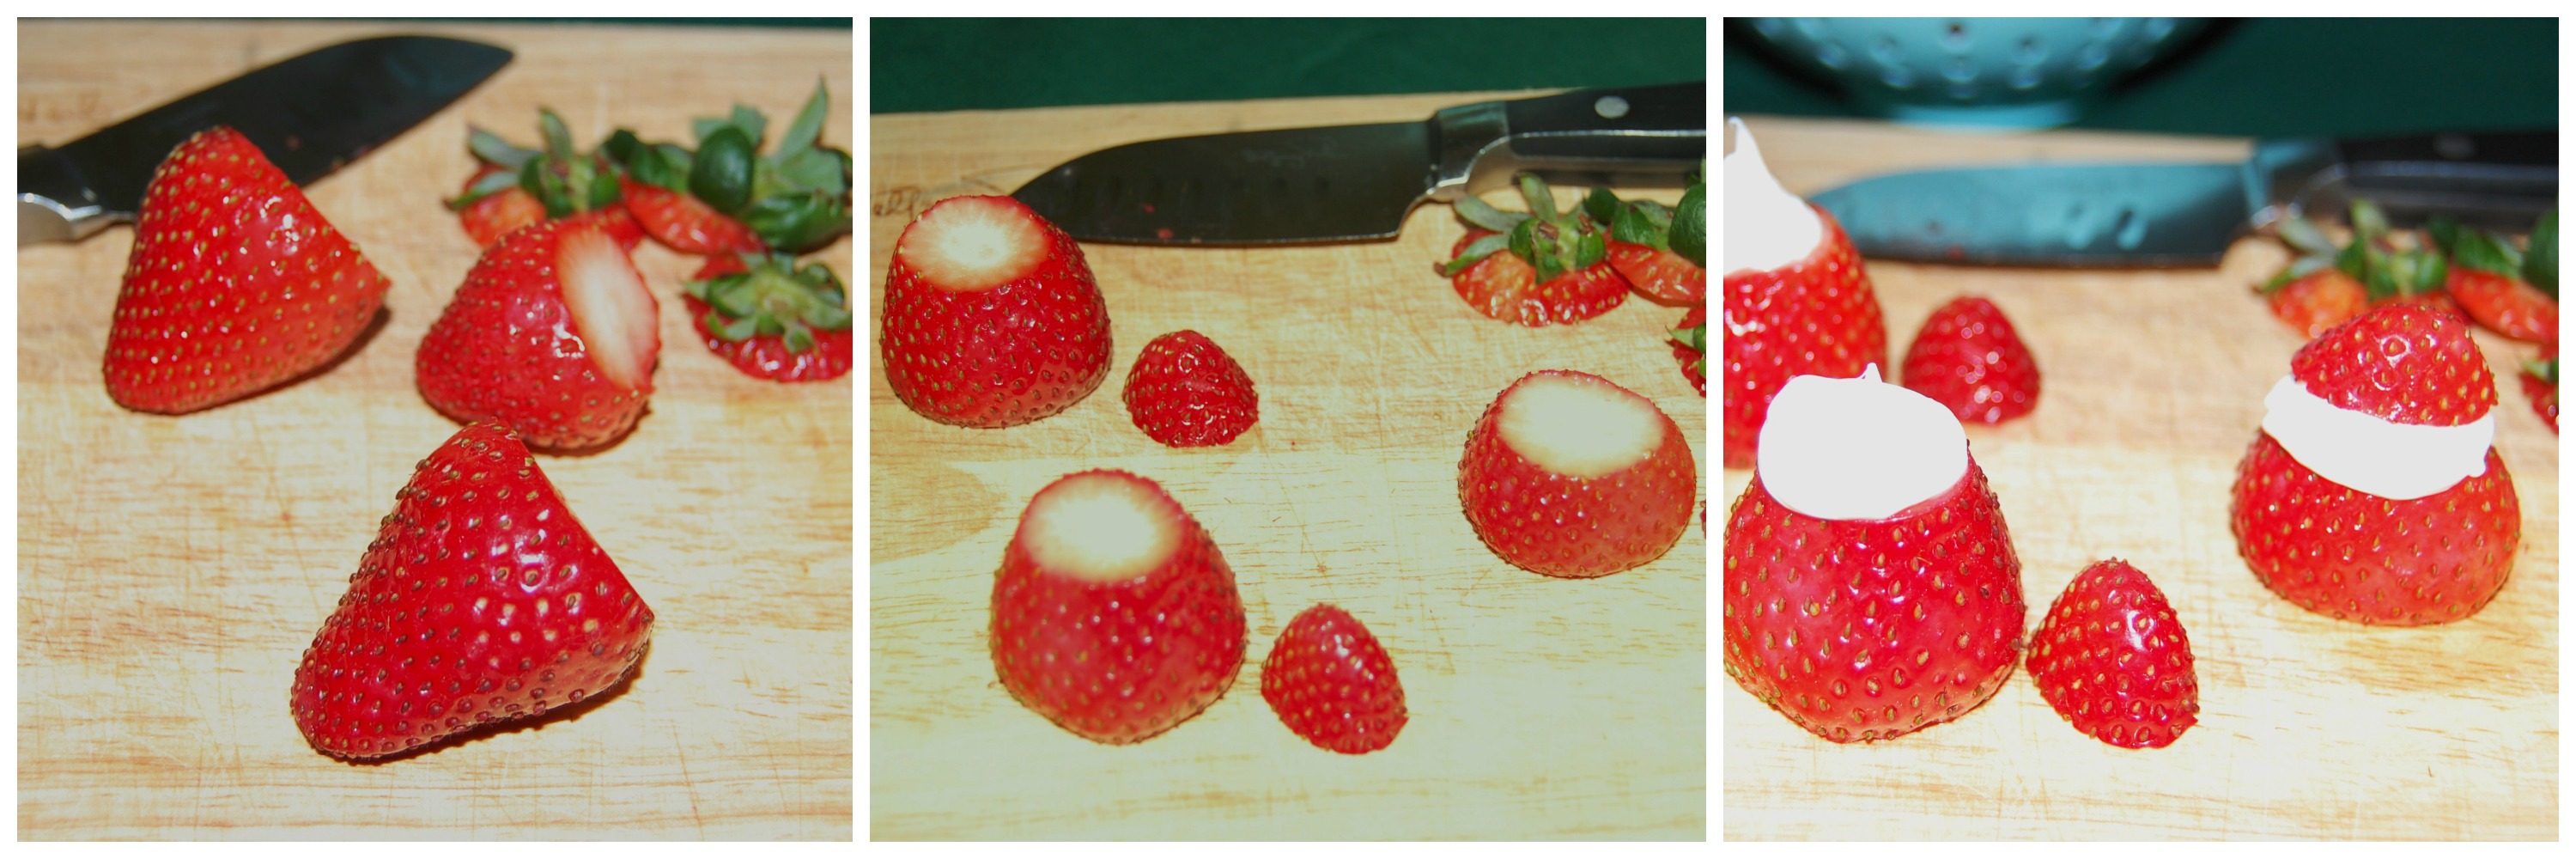
Pipe 2 small dots on the front of the larger piece to form buttons. Place 2 mini chocolate chips for eyes on the face. If you have any points from the frosting, you can flatten these by dipping your finger into confectioner sugar and pushing down the point. Refrigerate until ready for use.
You don’t want to place these onto the peppermint plate until the last minute as the moisture from the strawberries will melt the peppermint candy.
Assembly
If you choose to glue your tart pan to the vase, a low temp glue gun works well. Just make a ring of glue around the top of your vase, then place you tart pan, being careful to center it. This can easily be removed later by placing it in the freezer for 30 minutes, then gently prying between the vase and tart pan with a thin knife blade. Don’t force it.
If you are going to be eating your peppermint plate, cut a a piece of parchment paper to size and place underneath it so as the candy won’t be in contact with the painted surface. Try to remember and save the piece you used for melting, then trim to fit.
When you want to add your strawberries to the plate, pipe a small amount of frosting onto the peppermint plate so the strawberry won’t slide around. I would suggest you do this at your destination if you are traveling with this.
As with any of my projects, these are guidelines. You can choose to make it your own by using any color of filler or pan (plate). You could even use the vase as your package for a small gift. Colored candies or cake decorating supplies, can make this your own creation.
You might even consider making just the strawberry snowmen with your kids. Precautions would include the slicing of the strawberries and scooping out the insides. As always, direct supervision is always recommended.
I hope you all have enjoyed my contribution to It’s a Wonderful Week of Christmas Blog Tour. Check back each day for a new idea, plus, don’t forget to enter the hand made pallet sign.
You may also enjoy...

I’ve included affiliate links to Amazon for you to find some products easier. I may receive a small commission, but the price is the same for you. It just helps my blog out.
Happy Travels,
Rosemary


Love the gift idea, Rosemary!
Rosemary – Sooooo creative! I love all the different parts of your hostess gift and they can be used in many different ways, together and separately. Love it!
The snowmen are awesome. And I am all excited to try the peppermint plate. Where did you even come up with that idea? So brilliant and festive!
This is so cute! Thanks for hosting this awesome giveaway, too!